![21 Best Free Driver Updater Software For Windows 10/8/7 [Latest 2022]](https://wpcontent.innovanatechlabs.com/blog_innovanatechlabs/wp-content/uploads/2021/07/28133532/Best-driver-updater1-1-830x420.jpg)


![21 Best Free Driver Updater Software For Windows 10/8/7 [Latest 2022]](https://wpcontent.innovanatechlabs.com/blog_innovanatechlabs/wp-content/uploads/2021/07/28133532/Best-driver-updater1-1-65x65.jpg)


Windows is the most popular operating system for PCs. It offers some impressive features as well. However, some people might not be satisfied with Windows and may want a more customizable operating system. For those people, we have brought a perfect solution. They can dual boot Windows 10 and Ubuntu on the same computer. With the help of this, they can enjoy using Windows and Ubuntu altogether on the same PC. So now the question is – “How to dual boot Windows 10 and Ubuntu?”. First of all, let’s understand the specifications of Ubuntu, then we’ll proceed with the process of installing Ubuntu alongside Windows 10.
Unlike Windows, Ubuntu is an open-source operating system for PCs. Hence it is more flexible and customizable as compared to Windows. Also, it doesn’t require much effort and system configurations to install it on your computer, unlike the latest version of Windows. Along with being flexible, the operating system is also pretty secure. That’s why some people or we can say developers prefer Ubuntu before Windows and any other operating systems. Now, as you are familiar with the characteristics of Ubuntu, let’s check the steps to dual boot Windows 10 and Ubuntu.
Table of Contents
show
How to Dual Boot Windows 10 and Ubuntu?
Below mentioned are the steps that you can use dual boot Windows 10 and Ubuntu. But before that, we would like to advise you to create a backup of your data.
Step 1: Create Backup
We have mentioned it again, in case if you have missed our earlier advice. It is quite necessary to create a backup of the data stored on your computer before proceeding with any such process. If any error occurs during the process, it may cause you a permanent loss of your complete data. Hence, first of all, create a backup of your data, including the Windows data as well.
Step 2: Make Your USB or Any Other Disk Bootable of Ubuntu
After creating a backup of your whole Windows 10 data, now you are required to create a bootable USB or disk to dual boot Ubuntu on Windows 10. There are various such software available that can help you in doing so. You can take help from some guides available over the web to select the best bootable software for USB.
Step 3: Make Space for Ubuntu om your PC
Once you have created a bootable USB or any other disk, the next step is to install Ubuntu on Windows 10 is to make disk partition for Ubuntu. You can do it by using some particular disk management software. Or you can also do it manually. Here are the steps through which you can make disk partition to install Ubuntu alongside Windows 10.
1. First of all, search for “Command Prompt”.

2. After getting the result, click on Run as administrator.
3. Now type “diskmgmt.msc” and press enter.

4. At last, in the Disk Management utility, enter a space value on Shrink C:. It should be at least 20000 MB. After entering the space value, click on Shrink.

Also Read: Best Free File Backup Software For Windows 10, 8, 7
Step 4: Install Ubuntu
Now, as you have created a disk partition, you are required to install Ubuntu on your computer by the bootable USB or disk. This is the most important step to dual boot Windows 10 and Ubuntu. Here are the following steps that you are required to follow to install Ubuntu in Windows 10.
1. Insert the bootable USB to the appropriate port (or disk to the appropriate drive) on your computer.
2. Now reboot your computer with that USB or disk by pressing some special keys such as F12, F10, or F2, whichever is mentioned in your PC’s user manual.
3. As it starts booting, it shows a screen offering you many options such as Try Ubuntu without installing, Install Ubuntu, etc. Opt for Install Ubuntu from that menu and press the enter key to dual boot Ubuntu along with Windows 10.

4. Now let the booting process finish. After that, Ubuntu starts functioning on your system. Then you have to click on the second option from the top in Ubuntu launcher, i.e., Install Ubuntu 18.04 LTS.
5. Select your language and then select Continue to start the further process to dual boot Windows 10 and Linux Ubuntu.

6. After clicking on the Continue button, it will provide you so many options in the “Updates and other software” menu. You have to go for “Normal Installation”.
7. Click the Continue button.

8. Now, it will ask you the Installation type, select Install Ubuntu alongside Windows boot manager and then click the Install Now button.

9. After that, it will ask you to write the changes to the disks. Select Continue to proceed further to dual boot Windows 10 and Ubuntu.

10. Enter your location and select Continue.

11. Select a Keyboard layout from the options available.

12. Now you are just a few steps away to dual boot Ubuntu and Windows on your computer. Enter your username, computer name, password to continue.

13. After that, your system will start copying files of Ubuntu from the bootable USB or disk to your computer’s drive. Once it gets completed, it will ask you to restart your computer. Restart it by clicking on the option Restart Now.

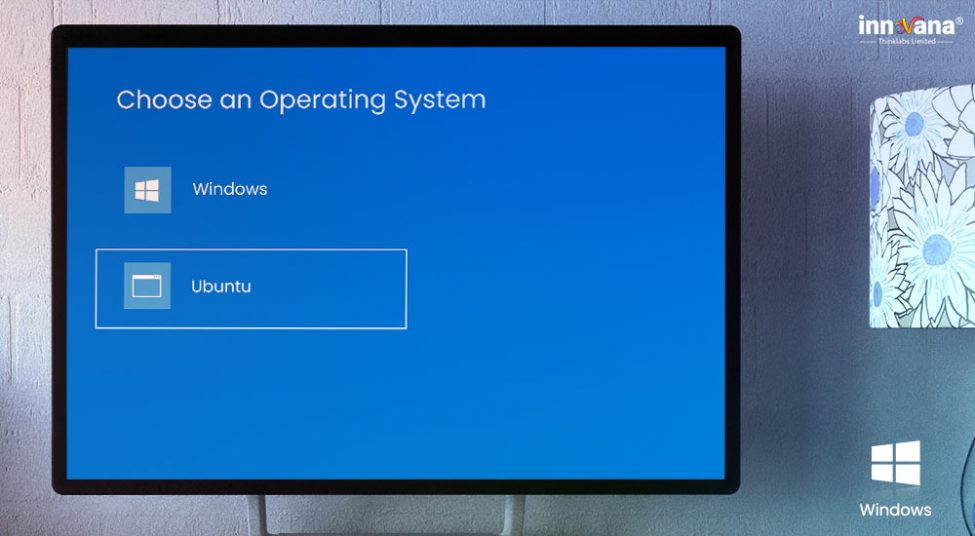
Hurray, you have successfully installed Ubuntu alongside Windows 10 on your computer. Now the bootloader will always ask you for the operating system before booting your computer.
So, these are the steps to dual boot Windows 10 and Ubuntu. Following these steps, you can enjoy the benefits of both Windows 10 and Ubuntu on the same system simultaneously. After installing Ubuntu along with Windows 10, it’s your choice which one you want to use at a particular time.
If you want to know more such tips and tricks about Windows and other operating systems, then subscribe to Innovana blogs and bookmark the page as well.