![21 Best Free Driver Updater Software For Windows 10/8/7 [Latest 2022]](https://wpcontent.innovanatechlabs.com/blog_innovanatechlabs/wp-content/uploads/2021/07/28133532/Best-driver-updater1-1-830x420.jpg)


![21 Best Free Driver Updater Software For Windows 10/8/7 [Latest 2022]](https://wpcontent.innovanatechlabs.com/blog_innovanatechlabs/wp-content/uploads/2021/07/28133532/Best-driver-updater1-1-65x65.jpg)


There’s no ambiguity that Mac machines are way powerful and alluring when it comes to working on them. However, the fact remains that the major population has been working on Windows machines and got into the habit of it. Also, it becomes a little difficult for the new users to work on a Mac right after having been working on Windows.
Although, I personally did not like Windows 8 as much as I loved the revolutionary Windows 10. No doubt, Windows 10 just transformed the way Microsoft worked for you. This was the first time that Mac users actually thought of switching to Windows.
So, can’t you just get the best of both worlds! Can you install Windows on a Mac?
Thankfully, you can. And, there’re multiple ways to enjoy your favorite Windows OS on a Mac OSx.
Table of Contents
show
How to get Windows 10 on Mac?
Out of many, there are two easy ways that you can follow to have Windows on a Mac. First, you can use the virtual machine that creates a virtual environment of Windows OS on your Apple device or the second, Boot Camp method.
Virtual Machine on Mac for Windows
When we talk about the virtual machine, it is just another application that lets you download on your Mac to experience the entire Windows desktop within a window on your Apple device. Not just it is super easy to use but it also sets you free of buying another computer. There are many virtual machines that you can get on your Mac like VMware, VirtualBox, and Parallels.
When you choose to go for virtual machines, you may surely enjoy both the operating systems on one machine, however, you must ensure to fulfill a few prerequisites of having a VM. You Mac must have at least 8 GB of RAM to run the VM smoothly. Also, the virtual machine software may cost you an arm and a leg. Moreover, the updates for VMs are not free. Alas!
Getting Windows 10 through Boot Camp on Mac
Boot Camp is a built-in feature on your Mac that allows you to create a separate partition to install Windows. It is important to know that Boot Camp is just a utility and not your passage to get Windows 10 on Mac for free. It would only help you create a partition in order to have both the operating systems on one machine.
Boot Camp Assistant is one of the easiest ways you can install another operating system on your Mac as it guides you through the installation process. Moreover, it is free and also helps your Mac to work robustly by putting less strain.
How to use Boot Camp to install Windows 10 on Mac?
Before you enjoy another OS on your Apple device, it is important to tune the required utility that way. You may follow the below steps to get started with your Windows OS on OSx.
Obtain a Windows disk image
- The first step towards getting Windows on your Apple OSx is to obtain the disk image file of the operating system. For that, you can go to the link below:
https://www.microsoft.com/en-us/windows/get-windows-10
- Then, click the second option that clearly states if you want the image file to install Windows on Mac.
 Microsoft Windows
- Now you can select the OS language, which may be English for you too, and proceed to buy or download the digital file.
Launch Boot Camp Assistant
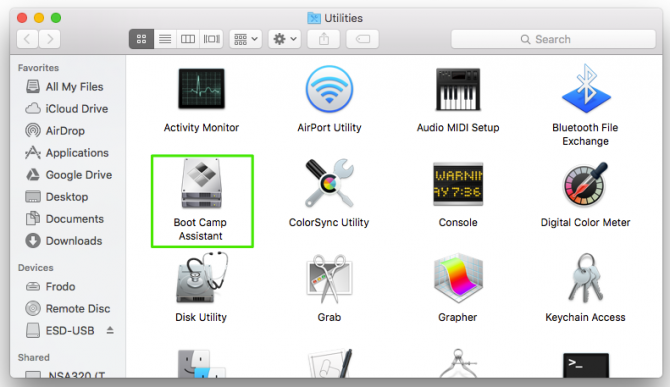
Boot Camp Assistant is a feature on your Mac that lets you create a separate partition for another operating system. You can access this feature under the Applications > Utilities folder. If you’re worried about its working then note that you just have to follow the on-screen instructions to install Windows on Mac OSx.
Create a partition for Windows 10 on your Mac machine
If you’re using a bootable flash drive to install Windows, it restarts your Mac to the Windows installer after you’re done setting up the Boot Camp Assistant. And, you Mac asks you the location to install Windows. Here, you may choose the Bootcamp partition and proceed to format. If you’re not using the bootable flash drive, it automatically selects and formats the right partition for you.
Install Windows
This is what you’ve been waiting for all that long. You’re just a few steps away to install Windows on Mac. So, here you go:
- Select the ISO file and click the install button.
- Enter your password to authorize the action and you’d be able to see the Windows installation screen.
- Select your preferred OS language and click the Install Now button.
- Place the product key or the license key or select ‘I don’t have…’ option.
- Choose between the Windows 10 Pro or the Windows Home and click Next.
- Now, click the Drive 0 Partition X: BOOTCAMP and click Next.
- Windows will be installed on your Mac.
- Once you get the setup screen, you may choose to go with Express Settings or Custom Settings. We recommend going Custom and switch off all the irrelevant entries.
- Create an account with a password and click Next to set up the Cortana settings.
Windows will boot completely enabling you to use it as a dedicated Windows computer. You’ll be shown the Welcome to Boot Camp Installer box, where you can click on Next and accept the terms in the license agreement. Then, click on Install to proceed. As soon as the installer completes, you may click on Finish to reboot your Mac.
Finally, restart and login to Windows
By default, your Apple device will always boot to Mac. To start booting Windows, you need to turn it on while holding the Option (Alt) key, and, you will be asked which drive you’d like to boot.
Now that you know how to install Windows on Mac, it is time to get some experiments done and enjoy the goodness of both. It is also a good practice to take a backup of your Mac before making any major changes. Also, you must ensure that you’re protecting Windows 10 and the data with the necessary tools and software. If you’re waiting for Windows 11 to roll out, don’t miss out on the article that addresses all your queries. In case, you need any assistance, do let us know in the comments below.