![21 Best Free Driver Updater Software For Windows 10/8/7 [Latest 2022]](https://wpcontent.innovanatechlabs.com/blog_innovanatechlabs/wp-content/uploads/2021/07/28133532/Best-driver-updater1-1-830x420.jpg)


![21 Best Free Driver Updater Software For Windows 10/8/7 [Latest 2022]](https://wpcontent.innovanatechlabs.com/blog_innovanatechlabs/wp-content/uploads/2021/07/28133532/Best-driver-updater1-1-65x65.jpg)


Undoubtedly, iPhones are ready to replace the traditional cameras with their super-advanced technology that is evolving with every latest launch. For the same reason, none of us can afford to lose our iPhone photo library in case of a theft or damage. And it has become essential to keep a backup of the pictures in a PC or Mac. Do not get disappointed if you are not sure about how to transfer your photos from the iPhone to a PC? In this article, we will make you learn some easy techniques for transferring your iPhone pictures to a PC and Mac both.
Table of Contents
show
Learn How to Transfer Photos from iPhone to PC
Transferring images from your iPhone device to a computer is not as challenging as it seems to be. Go through the following step-by-step guide and learn several ways to back up your iPhone picture library.
How To Transfer Photos From iPhone to a Windows 10 PC
Just because you are using an iPhone, it does not mean that you should also own a Mac device to backup your phone’s data. Particularly when it comes to transferring pictures from your iPhone to a Windows PC, it is as easy and convenient as the Mac. Here, we will focus on importing photos to a Windows 10 device. Follow this simple guide and forget all your worries –
Using a USB Cable to Import Photos from iPhone to PC
Let’s start with the most basic way to download pictures from your iPhone device to your Windows 10 PC. Before proceeding to follow the below-mentioned steps, make sure that your Windows 10 device has got iTunes installed on it. If not, you can do it from the official Apple website.
- Connect your iPhone to your Windows 10 PC using a USB cable.
- Click on the iPhone button located near the top left of the iTunes window in your Windows 10 device
- Click on ‘File Sharing’
- Mark the photos which you want to transfer in the list shown
- Click on ‘Save to’ option, select the location where you want to save the photos and click on ‘Save’
Using Windows Photos App to Get Pictures from iPhone to Computer
Your Windows 10 PC comes with a built-in Photos app that allows you to import photos from other devices, including your iPhone. Connect your iPhone to the Windows PC using a USB cable and follow the steps mentioned below –
Step 1: Plug your iPhone into your Windows 10 PC or laptop using a suitable USB cable
Step 2: Click on the ‘Start’ menu and search for the Photos App
Step 3: Launch the app and click on the ‘Import’ option situated on the top right-hand corner of the window

Step 4: Pick the photos which you want to import and select the location where you want to save them
Step 5: Click on ‘Continue’ and wait till the transfer is complete
Also Know: How to Update Drivers on Windows 10 Easily
Using iCloud to Move Photos from iPhone to PC
Another interesting way to get your pictures from your iPhone to the PC is through iCloud. But before proceeding further, make sure that your iCloud photo library is switched on in your phone. After that follow these quick and simple steps to enable iCloud on your Windows 10 PC –
Step 1: To download iCloud on your PC, click on the ‘Start’ menu and type ‘Microsoft Store’
Step 2: Launch it and search for iCloud

Step 3: Click on ‘Get’ and iCloud will be downloaded on your PC
Step 4: Install it and sign in with your Apple Id & password
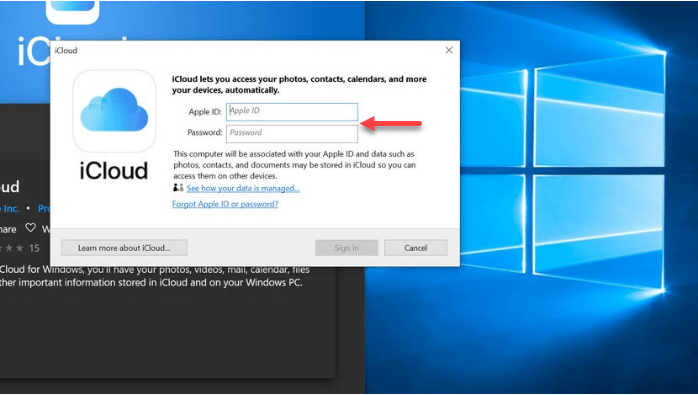
Step 5: Open the ‘Photo Options’
Step 6: Check the box for ‘iCloud Photos’ & ‘Download new photos & videos to my PC’
Step 7: Click ‘Done’ & then click on ‘Apply.’
Photos in your iCloud will now get download to your Windows 10 device automatically.
Note
While using a USB cable to import photos from your iPhone to the PC, make sure that your iPhone is unlocked so that your PC can read it. One other significant point to keep in mind is that your iPhone remains connected to your PC during the whole process.
Know More :- Best Free Antivirus For Windows
How To Transfer Photos From iPhone to Mac
Just as we have simplified the photo transfer process for a Windows PC user in the other section of this article, now we will make it easier for Mac users as well. Here, we are discussing the three quick and easy ways to move pictures from the iPhone to a Mac.
Using the Photos App to Transfer Pictures from iPhone to Mac
Using ‘Photos app’ is one of the simplest methods to transfer your iPhone pictures to the Mac. It does not require much effort and easily allows you to back up your photos.
Step 1: Connect your iPhone to the Mac device using a suitable USB cable
Step 2: Ensure that your iPhone is unlocked and you allow its connection to the Mac
Step 3: The photos app launches automatically, displaying the images of your iPhone. But if that doesn’t happen, launch the Photos App manually
Step 4: Click on your iPhone device in the Photos App window and your iPhone photos will be displayed
Step 5: You can either manually select each photo and click on ‘Import Selected’ or you can click on the option ‘Import all new items’

Using iCloud to Get Photos from iPhone to Mac
If you are familiar with the iCloud feature, then transferring photos from your iPhone to your Mac is a no-brainer. Before following the instructions, make sure that your iCloud photo library is switched on in your mobile device. After that, you can go ahead and follow the steps below:-
Step 1: Open the Photos App in your Mac
Step 2: Click on Photos>Preferences>iCloud
Step 3: Be sure to check the box beside the iCloud Photo Library
Step 4: Your iPhone photos now get synced to your Mac
Step 5: You can select your pictures and save them in any folder on your Mac as a backup

Also Know :- How To Install Windows 10 On Mac?
Using AirDrop to Import/Download Photos from iPhone to Mac
Using Airdrop is the most convenient method if you wish to transfer just a few photos from your iPhone to Mac. Before anything else, switch on the AirDrop on both your mobile and computer.
To enable it on your iPhone, go to Settings>General>AirDrop and then set the AirDrop settings to ‘Everyone’ so that it can send data to any device.
To enable it on your Mac, follow these steps:-
Step 1:Go to ‘Finder’
Step 2: In the menu bar, click on ‘Go’ and tap on AirDrop
Step 3: You will find the AirDrop icon at the bottom of the window
Step 4: From the dropdown shown below the icon, select ‘Everyone’

Wait for both the devices to discover each other and once it is done follow these steps –
Step 1: Go to ‘Photos’ on your iPhone
Step 2: Select the images
Step 3: At the bottom-left corner, click on the sharing button
Step 4: Wait for the AirDrop to detect your Mac & then click on it
Step 5: Accept the popup on your Mac device to get your photos downloaded
Conclusion
This article on ‘how to transfer photos from iPhone to PC’ is definitely going to save a lot of your time and effort. So wait no more, pick any one of the above methods and start backing up your favorite photos and selfies!