![21 Best Free Driver Updater Software For Windows 10/8/7 [Latest 2022]](https://wpcontent.innovanatechlabs.com/blog_innovanatechlabs/wp-content/uploads/2021/07/28133532/Best-driver-updater1-1-830x420.jpg)


![21 Best Free Driver Updater Software For Windows 10/8/7 [Latest 2022]](https://wpcontent.innovanatechlabs.com/blog_innovanatechlabs/wp-content/uploads/2021/07/28133532/Best-driver-updater1-1-65x65.jpg)


Read this comprehensive guide on how to free up disk space on Windows 10. It provides multiple solutions to get rid of the storage full warning message on your Windows PC.
All our PCs have a limited disk space. Hence, there is always a chance of getting the storage full. And this is one of the worst situations as it prevents you from saving anything on your PC, no matter how important it is. Along with this, your system also starts performing sluggish when the storage gets full. Hence, it is essential to clean the hard disk regularly. But not everyone knows how to free up disk space on Windows 10. Considering this, today, we are here with this comprehensive yet simple guide to clear disk space on Windows 10.
Even for the tech experts, it is one of the most tricky tasks to clean up PC storage. The reason is no one exactly knows what is hogging their hard disk. Hence, in this post, we have discussed 13 different solutions to free up disk space on Windows 10. So, without being sluggish like a PC showing the storage-full warning, let’s proceed to the guide.
Also Read: How to Fix 100% Disk Usage in Windows 10
Table of Contents
show
How To Free Up Disk Space On Windows 10 PC
Your search for how to free up disk space on Windows 10 PC ends here. Below are the helpful solutions to clean the hard drive and restore the disk storage on your computer.
Solution 1: Clean The Recycle Bin
When you delete something on your Windows 10 PC, it doesn’t get deleted permanently. The system transfers the file to the Recycle Bin so that you can restore it if required in the future. To delete the file or folder permanently, either you have to press the Shift + Delete keys on your keyboard or remove it from the Recycle Bin. If there are multiple files in the Recycle Bin and you want to remove all of them from your PC, then you can follow these steps.
- Open the Recycle Bin from the icon available on your Desktop. If you can’t find it on your Desktop, then search & open the Recycle Bin using the Windows Search feature.
- After opening the Recycle Bin, select the Recycle Bin Tools or Manage tab.
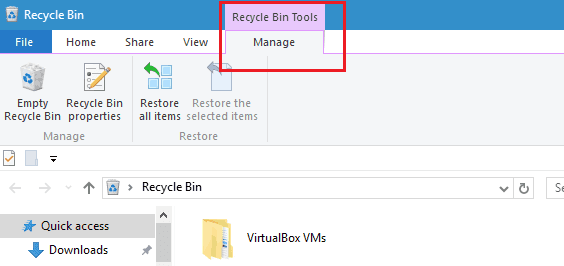
- Then, choose the Empty Recycle Bin option.
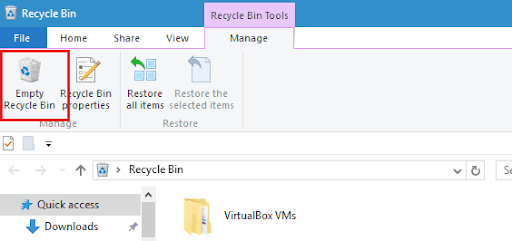
- At last, select the Yes option to remove files from Recycle Bin and free disk space on your PC.
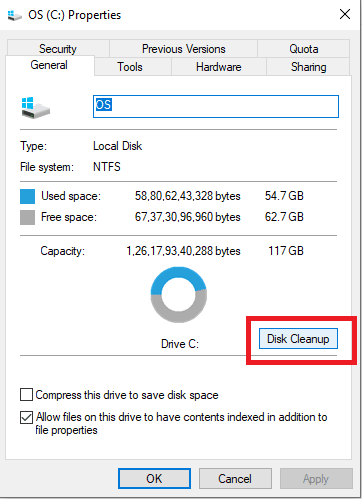
Solution 2: Use Disk Cleanup
You can also try the Disk Cleanup tool of Windows to clean the hard drive. The utility helps to clean C drive in Windows 10 by eliminating the temporary files, shadow copies, and older system restore points. Here are the steps to use Disk Cleanup and retrieve the lost storage.
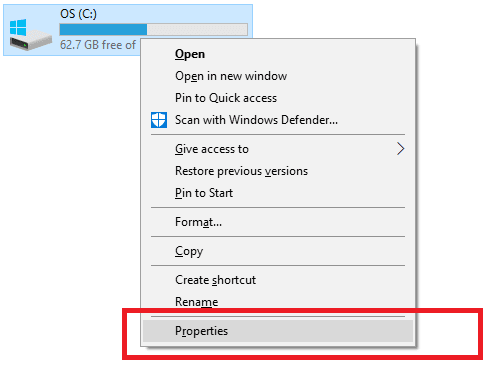
- Open My PC/This PC from your desktop or File Explorer.
- Now, go to the C: drive and right-click on it.
- Click on the Properties option available at the bottom of the right-click menu.
- In C: Drive properties, click on the Disk Cleanup button.
- Now you have to wait till Windows performs calculations.
- After that, it provides you with a list of files to delete. You have to click on the Clean up system files button.

- Then, checkmark all the listed files.
- Click on the OK option.
- At last, select Delete Files.
Along with the temporary files, you can also delete the shadow copies & older system restore points to retrieve some space on the C drive. Below are the necessary steps that you have to follow.
- Just like above, open My PC/This PC from your desktop or File Explorer.
- Now, go to the C: drive and right-click on it.
- After that, click on the Properties option available at the bottom of the right-click menu.
- Then, click on the Disk Cleanup button in C: Drive properties.
- Now you have to wait till Windows performs calculations.
- After that, you have to click on the Clean up system files button.
- Then, select the More Options tab.
- Select the ‘Clean up…‘ option available under System Restore and Shadow Copies.
- At last, select the Delete option to remove system restore points and shadow copies and ultimately free up disk space on Windows 10.
Solution 3: Use Storage Sense Feature Of Windows 10
Windows 10 offers a built-in junk cleaning features known as Storage Sense. Enabling this tool of the operating system helps you to get rid of unwanted files and eventually get more disk space. Here is how you can enable Storage Sense on your Windows 10 PC.
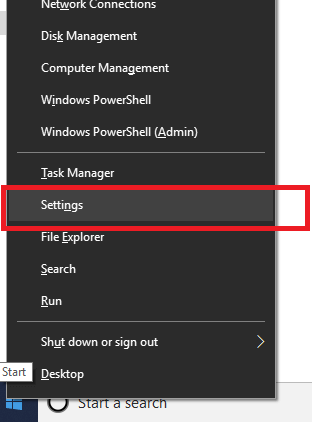
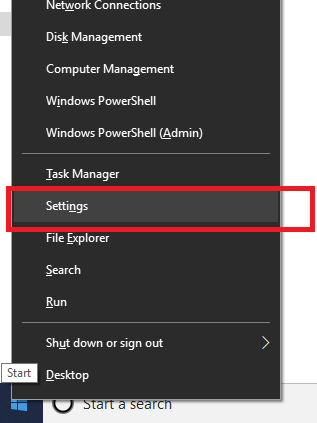
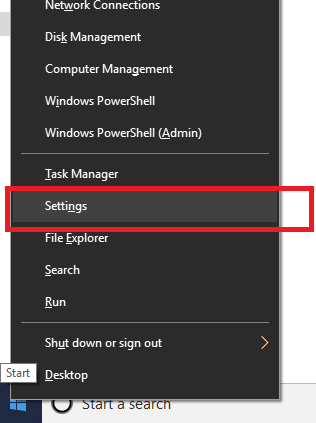
- With your mouse, do a right-click on the start icon of Windows 10.
- Click on Settings in the shown menu.
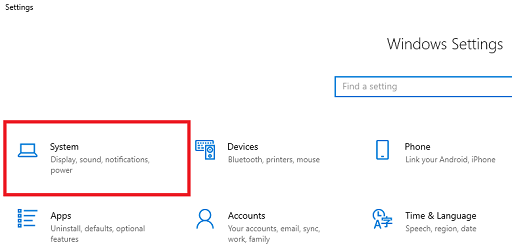
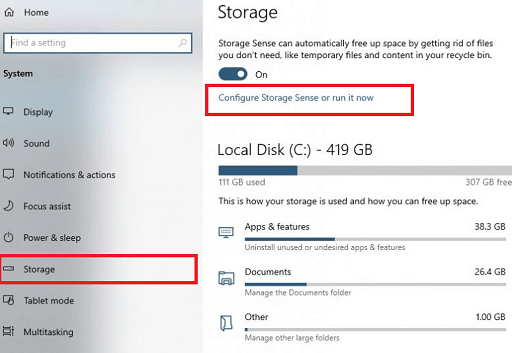
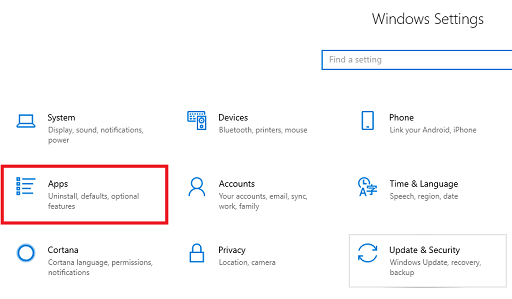
- In Settings, choose System.
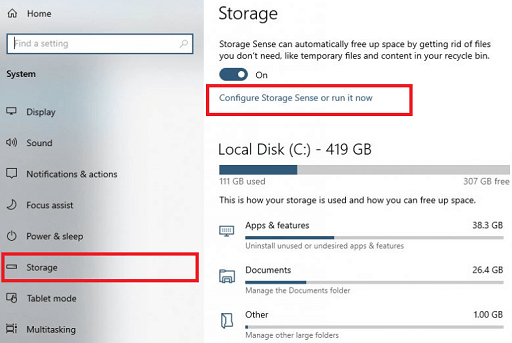
- Now, go to the Storage settings.
- After that, you have to click on the highlighted Configure Storage Sense or run it now tab.
- Enable the Storage Sense.
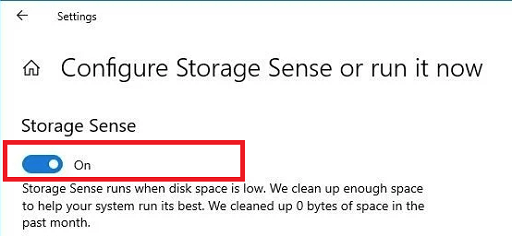
- Once you have enabled the Storage Sense, set the schedule to run Storage sense automatically on your PC.
It’ll help you to eliminate all the junk automatically as per the set schedule. However, if you are looking to free space on Windows 10 PC immediately via Storage Sense, then here is all you have to do.
- Follow the instructions provided above to access the Storage settings of your Windows 10 PC.
- Then, click on the highlighted Configure Storage Sense or run it now tab.
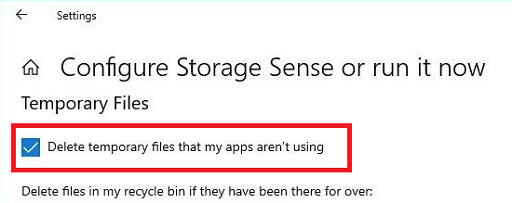
- After that, select the Delete temporary files that my apps aren’t using option.

- Then, set the duration to delete Recycle Bin & Downloads folder data.
- Once you have set the duration to remove data from Recycle Bin and Downloads folder, specify a schedule for OneDrive content synchronization.
- After this, checkmark the Delete previous versions of Windows option.
- At last, select the Clean now option to clean the hard drive.
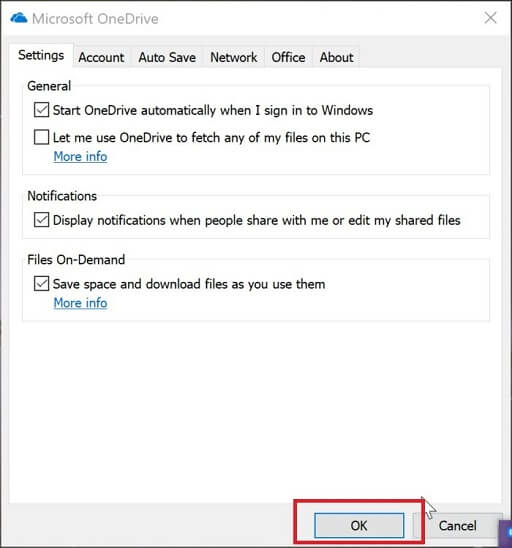
Solution 4: Try OneDrive Files On-Demand Feature
Another helpful solution to clear disk space on Windows 10 is making the data available online only using OneDrive. For this, you first have to enable the OneDrive Files On-Demand. Here are the needed steps.
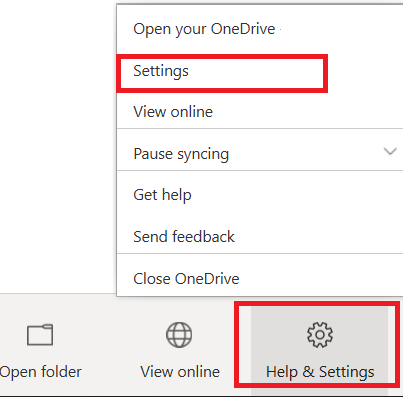
- Go to the OneDrive icon available on the right side of the Windows 10 taskbar and click on it.
- After that, select Help & Settings.
- Then, choose the Settings option.
- Now, go to the Settings tab.
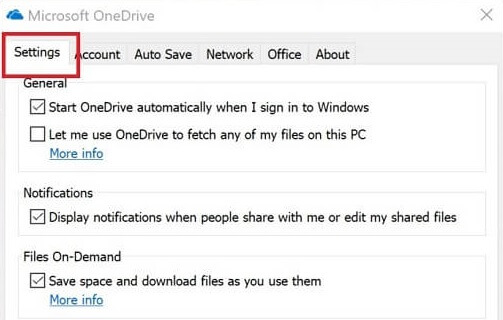
- Select the ‘Save space and download files as you use them’ option available under File On-Demand.
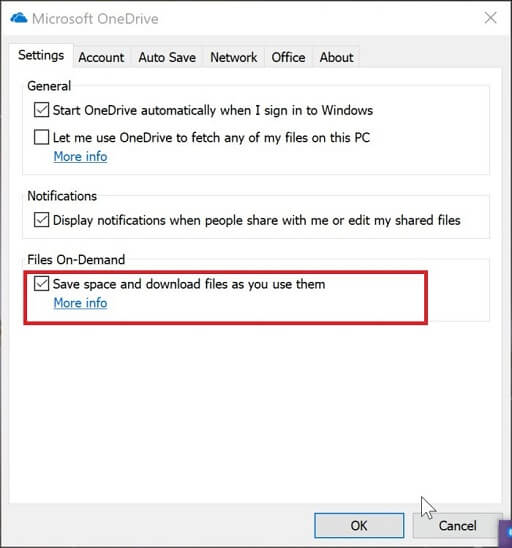
- Choose OK to enable the OneDrive Files On-Demand feature.
After enabling the OneDrive Files On-Demand, here is how you can make your data available online only.
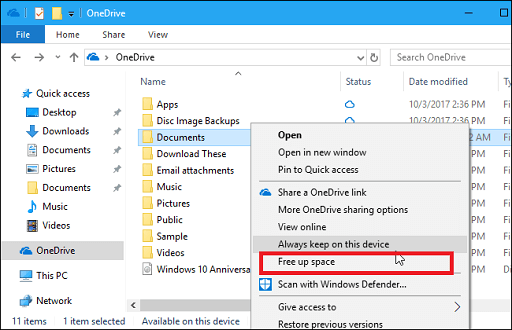
- Click on the File Explorer icon available on the taskbar.
- Then, select the OneDrive option from the left panel.
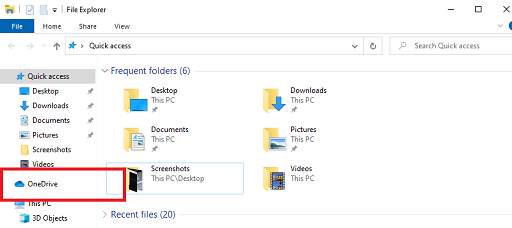
- Now, you have to choose the space-hogging files and folders.
- After selecting, make a right-click on the selected items.
- Click on the Free up space option in the context menu to free disk space.
Also Read: Best RAM Cleaner, Optimizer, and Booster for Windows 10
Solution 5: Uninstall Unwanted Apps, Games, & Other Utilities
All of us have several programs, games, and utilities installed on our PCs. However, we do not require all of them. Hence, it is good to uninstall such utilities, or else they may acquire a large proportion of your disk space. Below are the steps to uninstall unwanted software and games manually on your Windows 10 PC.
- With your mouse, do a right-click on the start icon of the Windows 10.
- Click on Settings in the shown menu.
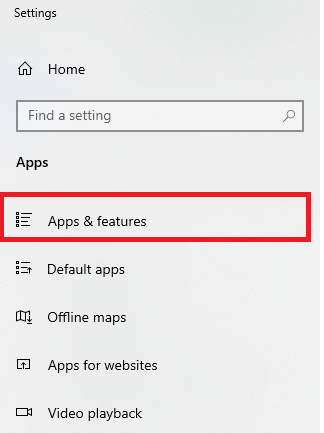
- In Settings, choose Apps.
- Now, select the Apps & features option from the left panel.

- After that, go through the list of installed apps on your PC.
- Click on the one you want to remove from your computer.
- Select the Uninstall option.
You can repeat it for all the apps that you want to uninstall on your Windows 10 PC. However, if you find it time-wasting to remove programs manually from your computer, then you can use some best app uninstallers for Windows to do the task automatically.
Solution 6: Transfer Files To An External Drive
If you are constantly getting the ‘Storage Full’ warning, then one of the most effective solutions that you can try is to transfer the local files to an external drive. First of all, you have to install an external drive on your PC. After that, below are the steps that you have to follow to transfer your local data & files to the new drive.
- Click on the File Explorer icon available on the taskbar.

- Then, navigate to the location of the file or data that is hogging your space.
- After that, select that file or folder.
- Now, go to the Home tab.
- Select “Move to” option.
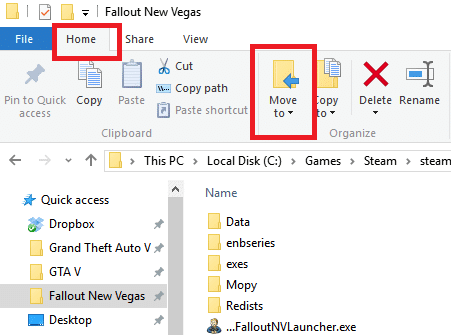
- Then, click on the Choose location option.
- Choose the external drive that you have installed.
- At last, select the Move option and start the file transfer.
Along with the files, you can also transfer the installed programs to the external drive to get some extra free space. Below are the needed steps.
- With your mouse, do a right-click on the start icon of Windows 10.
- Click on Settings in the shown menu.
- In Settings, choose Apps.

- Now, select the Apps & features option from the left panel.
- After that, go through the list of installed apps on your PC.
- Click on the one you want to transfer to the external drive.
- Select the Move option.
- Now, set the external drive as the new location.
- At last, click on Move to free up disk space on Windows 10.
Also Read: 14 Best File Copy Utility Software for Windows 10, 8, 7 in 2021
Solution 7: Enable Windows 10 NTFS Compression
You can also compress your files and drives to free space on Windows 10. Windows provide an NTFS compression option to help you decrease the file or drive size. First, let’s discuss how to enable NTFS compression on files & folders.
- Navigate to the file or folder you want to compress.
- Then, right-click on it.
- After that, select the Properties option from the context menu.
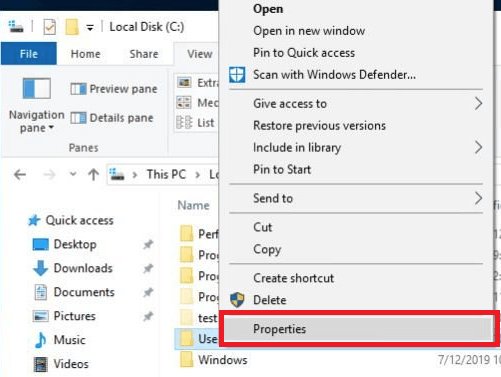
- In Properties, select the ‘Advanced…’ option.
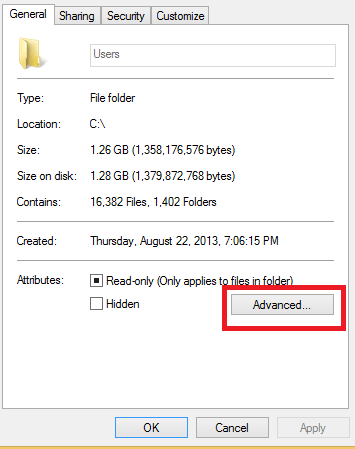
- In the Advanced Attributes dialog box, mark the Compress contents to save disk space option available under the Compress or Encrypt attributes tag.
- Then, select the OK option.
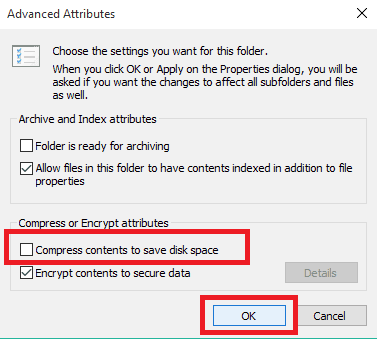
- Now, choose the Apply button.
- After that, select Apply changes to this folder, subfolders, and files.
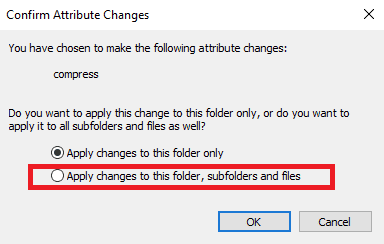
- Select OK.
- Now again, click on the OK to compress the selected file or folder.
If you want to enable NTFS compression on a particular drive, then here are the steps that you have to follow.
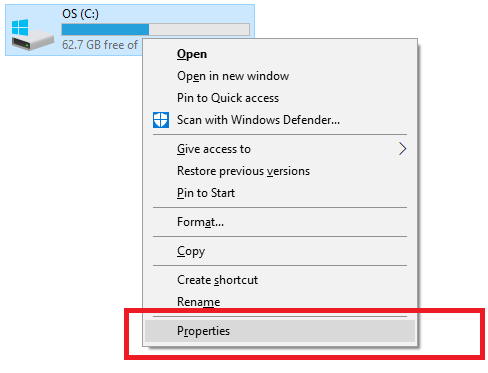
- Open My PC/This PC from your desktop or File Explorer.
- Right-click on the drive and select Properties.
- Mark Compress this drive to save disk space option in the Properties dialog box.

- After that, select Apply.
- Now, in the Confirm Attribute Changes dialog box, choose ‘Apply changes to drive (drive letter), subfolders, and files’ and click OK.
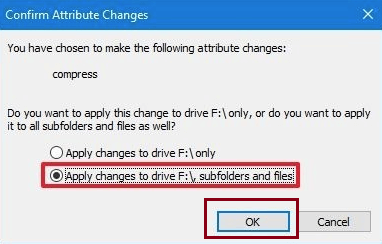
- At last, click on the OK to compress the selected drive.
Solution 10: Disable Hibernation
Windows operating system saves memory data in the form of hiberfil.sys file on your hard drive to ensure the safety of your current session. This feature is known as hibernation. However, hibernation is pretty helpful, but it consumes a hefty amount of your drive space. You can disable the hibernation feature on your Windows 10 PC to clean the C drive and get more disk space. Here is what you have to do.
- Search Command Prompt using the Windows Search feature
- Click on Run as administrator.
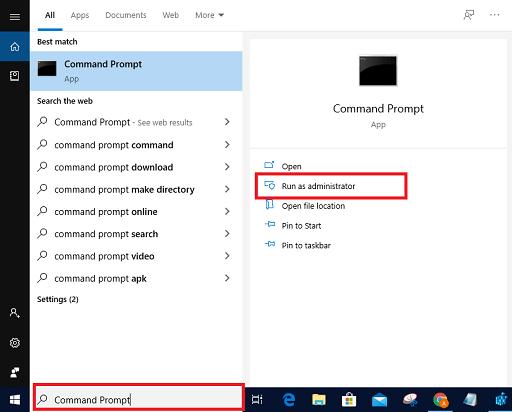
- Type ‘powercfg /hibernate off’ command and press the Enter key on your keyboard to disable hibernation on your Windows 10 PC.
Solution 9: Use Compact OS
Compact OS is a benefit offered by Windows that helps to reduce the size of the operating system and its related apps & files. It serves as a decent solution if your storage is getting full. Here is how you can use the Compact OS feature to free up disk space on Windows 10.
- Search Command Prompt using the Windows Search feature
- Click on Run as administrator.

- Type ‘compact.exe /compactOS:always’ command and hit the Enter key on your keyboard.
Following the above steps will help you to shrink the size of Windows 10 and apps installed. However, any mistake can cost you a lot and even the complete data loss. Hence, we suggest you create a backup for all your data before proceeding with this method to regain disk space.
Also Read: Best Free Hard Drive Encryption Software for Windows 10
Solution 10: Rebuild Or Configure Windows 10 Search Indexer
Sometimes, indexing issues can make the Widows database grow immensely. It eventually causes storage troubles on the PC. However, do not worry. One can easily get rid of this by rebuilding or configuring the Windows 10 Search Indexer. First of all, let’s check out the method to rebuild the Search Indexer and clean the hard disk of your PC.
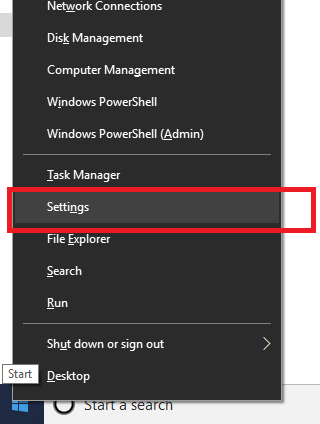
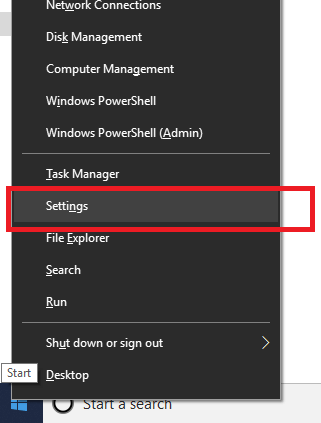
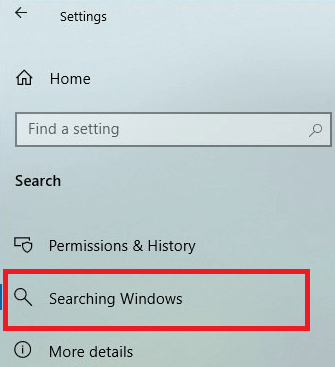
- Do a right-click on the start icon of Windows 10.
- Click on Settings in the shown menu.
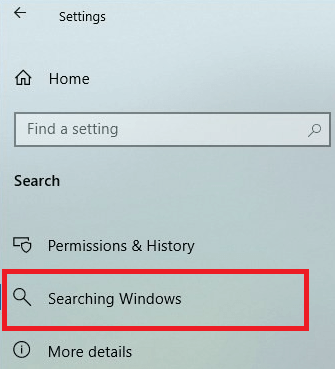
- In Settings, choose Search.

- After that, choose Searching Windows on the left panel.
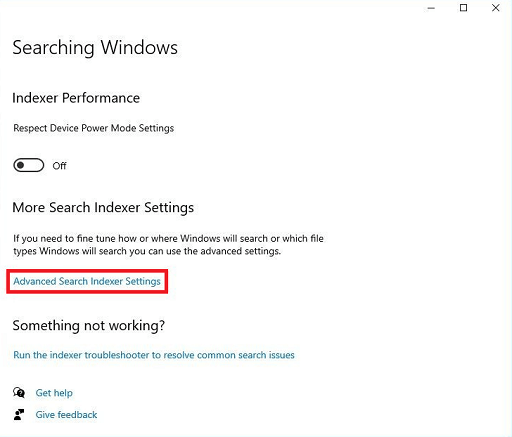
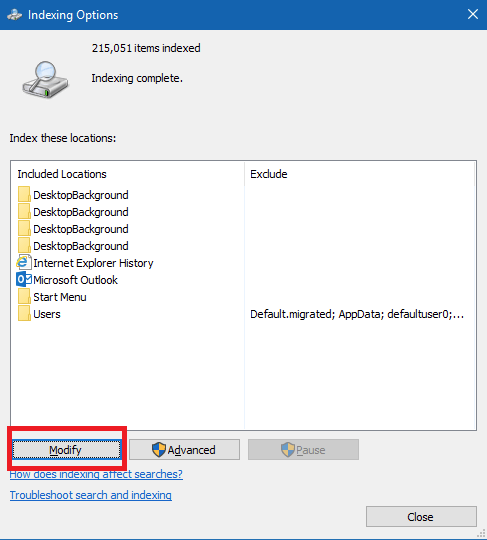
- Then, select Advanced Search Indexer Settings available below More Search Indexer Settings.
- Now, click on the Advance option.
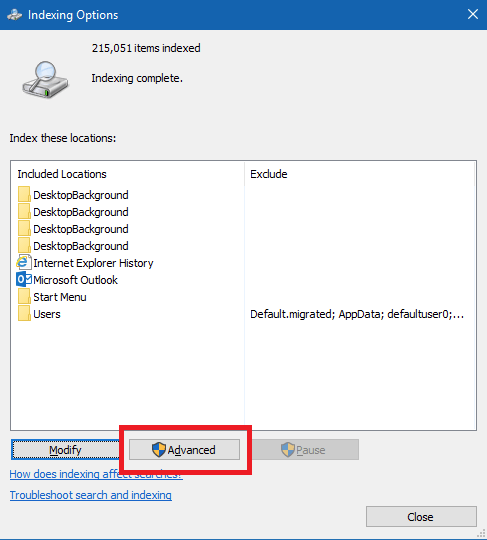
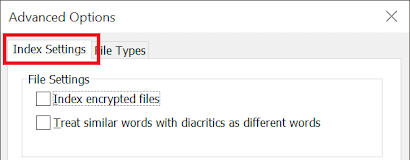
- Go to the Index Settings tab.
- Choose the Rebuild option available under Troubleshooting.
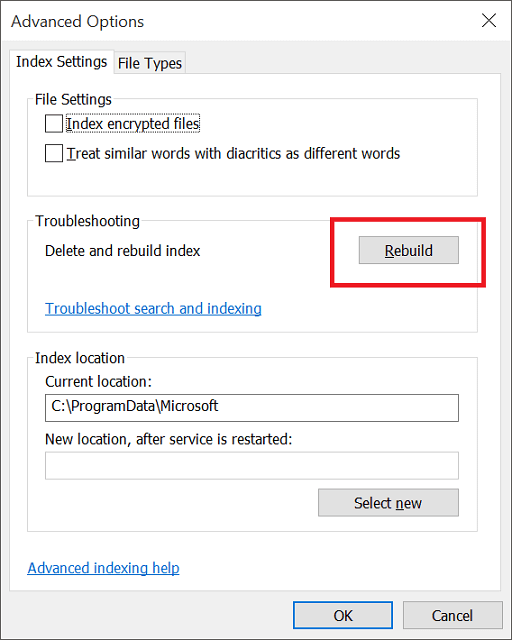
- At last, choose OK to rebuild the Search Indexer.
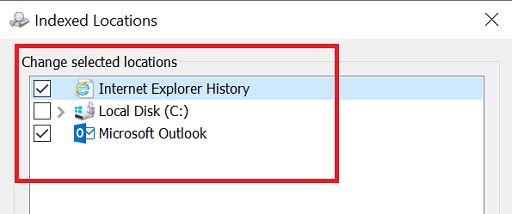
If you want to configure the Search Indexer, then below are the instructions you have to follow.
- Do a right-click on the start icon of Windows 10.
- Click on Settings in the shown menu.
- In Settings, choose the Search option.
- After that, choose Searching Windows on the left panel.
- Then, select Advanced Search Indexer Settings available below More Search Indexer Settings.

- Now, click on the Modify option.
- Select Show all locations.
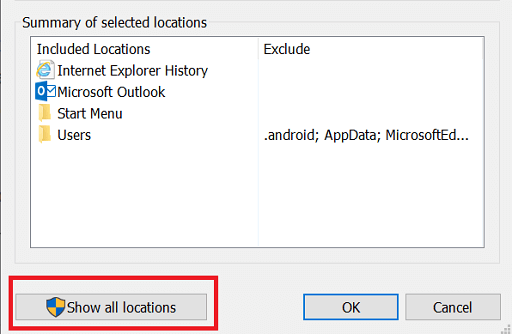
- Unmark the options that you want to remove from the index.
- Now, click on the arrow-like icon for C drive. It will help you to expand the components of the drive.
- Unmark the options that you want to remove from the search.
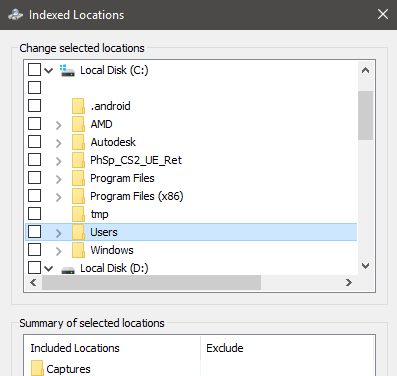
- Then, select the OK option.
- And, finish the configuration process by choosing the Close option.
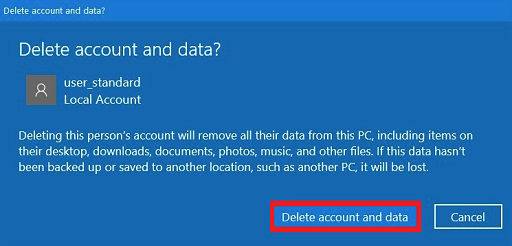
Solution 11: Delete Unwanted User Accounts
If you share your PC with other users, then you might have created multiple user accounts. However, it is necessary to remove those accounts that are not in use. It helps you to have more space on the hard drive for the active users. Hence, deleting unwanted and unneeded user accounts can be a great solution to clear disk space on Windows 10. Below are the necessary steps to do so.
- Move the cursor to the taskbar of your Windows 10 PC and right-click on the Windows icon available on it.
- Click on Settings in the shown menu.

- In Settings, choose the Accounts option.
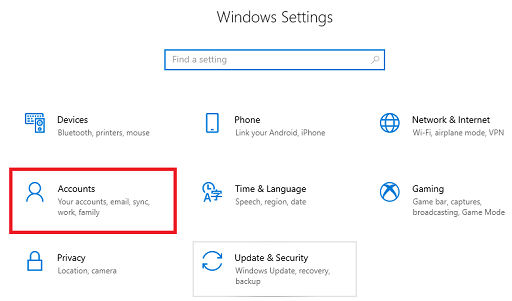
- After that, choose the Family & other users option from the left pane in Accounts settings.
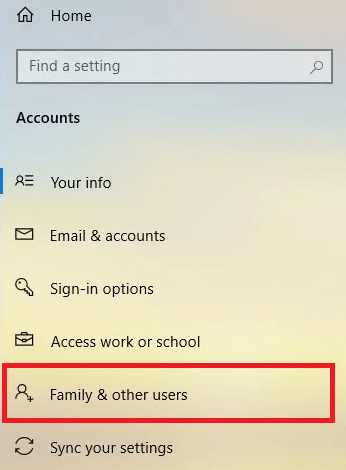
- Then, click on the user accounts that you do not want to be on your PC anymore.
- Now, select the Remove option.
- Proceed with deleting the respective account and its data by selecting Delete account and data.
Also Read: Best PC Optimizer Software for Windows 10, 8, 7
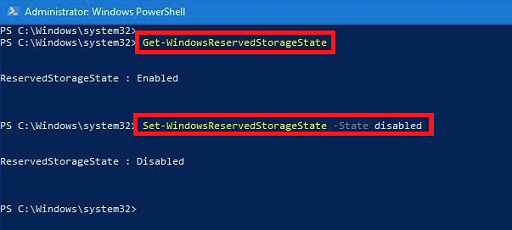
Solution 12: Disable Windows Reserved Storage
Windows reserves a specific amount of your system storage for the updates, cache, & other temporary files. However, just like hibernation, it is also a quite useful feature offered by the operating system. But, if you have a PC with low storage, then it may trouble you. Hence, to regain some additional space on your hard disk, you can disable the Windows Reserved Storage feature.
However, we do not recommend this method to every PC user. Disabling Windows Reserved Storage may cause several troubles during your next Windows Update. Hence, we suggest you to proceed with this solution only if you are a tech expert or someone who understands this function of Windows quite well. Below are the instructions to disable Reserved Storage on your Windows 10 PC.
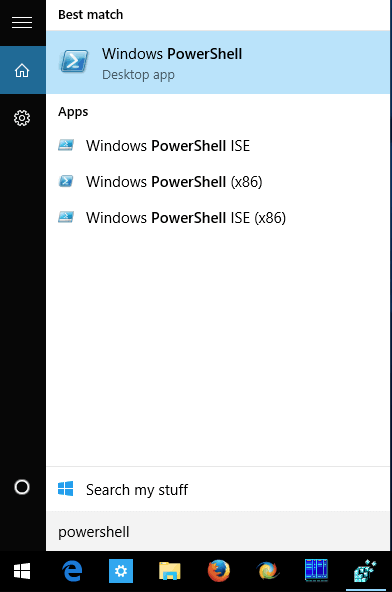
- Search PowerShell using the Windows Search feature.
- Click on Run as administrator.
- Now check whether your Windows PC has the Reserved Storage feature enabled or not. You can do this by typing the following command in Windows PowerShell.
Get-WindowsReservedStorageState - After providing the above command, press Enter.

- Now, disable the Windows Reserved Storage if your PC has the Reserved Storage feature enabled. You can do this by typing the following command.
Set-WindowsReservedStorageState -State disabled - Complete the command to disable Windows Reserved Storage and free space on Windows 10 by pressing the Enter key on your keyboard.
Final Words On The Guide To Free Up Disk Space On Windows 10
Well, that was all we have to share with you on resolving the storage-full problem on your PC. It was a comprehensive guide to free up disk space on Windows 10. We hope the above solutions helped you to clean the hard drive of your computer. There are multiple benefits of having more disk space. So, keep your storage clean by following the above methods. However, if you think that we have missed something important on the topic, then feel free to share it via comments.
Furthermore, subscribe to the Innovana blog. We regularly share various such guides and posts to help you keep your PC uncluttered and high performing.